If you don't use the added features in Excel 2010 and later (such as Backstage View), you can just add the RibbonX using the Office 2007 Custom UI Parts option (customUI.xml), it will load customUI.xml when you open the Excel file in Excel 2007 and later. However, if you open the Excel file in Excel 2010 and later and there is also a customUI14.xml file, it will only load that file.
If you want to insert a button in the Office Button menu when you open your file in Excel 2007 and a button in Backstage View when you open the workbook in Excel 2010 and later then you must insert RibbonX in both the xml files.
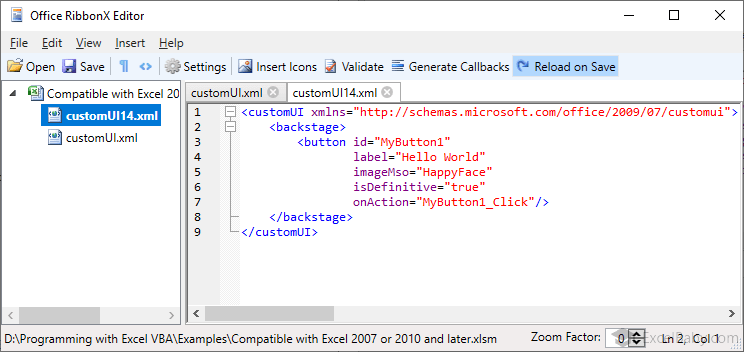
Compatible with Excel 2007 or 2010 and later
The following example add RibbonX that creates a button in the Office Button menu when you open your file in Excel 2007 and a button in Backstage View when you open the workbook in Excel 2010 and up.
- Open your Excel file with Office RibbonX Editor.
- From the Insert menu, choose Office 2010+ Custom UI Part. This will add a
customUI14.xmlentry under your workbook in the tree view on the left. - Paste the following RibbonX code in the
customUI14.xmlfile for Excel 2010 and later:<customUI xmlns="http://schemas.microsoft.com/office/2009/07/customui"> <backstage> <button id="MyButton1" label="Hello World" imageMso="HappyFace" isDefinitive="true" onAction="MyButton1_Click"/> </backstage> </customUI> - Click the Validate button on the toolbar to verify the code to make sure there are no spelling errors. An XML document that conforms to the syntax rules is called a "Well Formed" XML document.
- From the Insert menu, choose Office 2007 Custom UI Part. This will add a
customUI.xmlentry under your workbook in the tree view on the left.
- Paste the following RibbonX code in the
customUI.xmlfile for Excel 2007:<customUI xmlns="http://schemas.microsoft.com/office/2006/01/customui"> <ribbon> <officeMenu> <button id="MyButton1" label="Hello World" imageMso="HappyFace" onAction="MyButton1_Click"/> </officeMenu> </ribbon> </customUI> - Click the Validate button on the toolbar to verify the code to make sure there are no spelling errors.
- Click the Save button in the Office RibbonX Editor.
- Open the file in Excel.
- Press Alt + F11 to open the VBE, and paste the following code into the a normal module:
'Callback for MyButton1 onAction Sub MyButton1_Click(control As IRibbonControl) MsgBox "Hello World!" End Sub - Click the Save button in the VBA editor.
- Test the workbook in Excel 2007 and 2010 and later.