The splitButton element specifies a split button control. A split button control is composed of either a button or a toggle button, and a drop-down menu. The icon and label shown on the split button come from the button or toggleButton child element.
Graphical View of splitButton Attributes
The following example shows the visible graphical attributes you can set on the splitButton control.
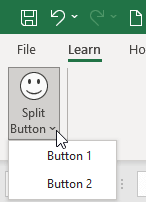
This is specified using the following XML:
<customUI xmlns="http://schemas.microsoft.com/office/2009/07/customui">
	<ribbon>
		<tabs>
			<tab id="tabLearn"
			     label="Learn"
			     insertBeforeMso="TabHome">
				<group id="grpDemo"
				       label="Demo">
					<splitButton id="splitButton"
					             size="large">
						<button id="button"
						        imageMso="HappyFace"
						        label="Split Button"/>
						<menu id="menu">
							<button id="button1"
							        label="Button 1"/>
							<button id="button2"
							        label="Button 2"/>
						</menu>
					</splitButton>
				</group>
			</tab>
		</tabs>
	</ribbon>
</customUI>
Parent Elements
- box
- buttonGroup
- dynamicMenu
- group
- menu
- officeMenu
Children Elements
Required Attributes
The id, idQ, and idMso attributes are mutually exclusive. At least one of these attributes MUST be specified.
| ATTRIBUTE | WHEN TO USE |
|---|---|
| id | Create your own splitButton |
| idMso | Use an existing built-in splitButton |
| idQ | Create a splitButton shared between namespaces |
Optional insert Attributes
The insertAfterMso, insertAfterQ, insertBeforeMso, and insertBeforeQ attributes are mutually exclusive. If none of these attributes are specified, the controls SHOULD be appended to the existing set of controls, in the order they are defined in the XML.
| INSERT ATTRIBUTE | ALLOWED VALUES | DEFAULT VALUE | WHEN TO USE |
|---|---|---|---|
| insertAfterMso | Valid Mso Group | Insert at end of group | Insert after built-in control |
| insertBeforeMso | Valid Mso Group | Insert at end of group | Insert before built-in control |
| insertAfterQ | Valid Group idQ | Insert at end of group | Insert after shared namespace control |
| insertBeforeQ | Valid Group idQ | Insert at end of group | Insert before shared namespace control |
Optional Attributes and Callbacks
| STATIC ATTRIBUTE | DYNAMIC ATTRIBUTE | ALLOWED VALUES | DEFAULT VALUE | VBA CALLBACK SIGNATURE FOR DYNAMIC ATTRIBUTE |
|---|---|---|---|---|
| enabled | getEnabled | true, false, 1, 0 | true | Sub GetEnabled (control As IRibbonControl, ByRef returnedVal) |
| keytip | getKeytip | 1 to 3 characters | (none) | Sub GetKeytip (control As IRibbonControl, ByRef returnedVal) |
| showLabel | getShowLabel | true, false, 1, 0 | true | Sub GetShowLabel (control As IRibbonControl, ByRef returnedVal) |
| tag | (none) | 1 to 1024 characters | (none) | (none) |
| visible | getVisible | true, false, 1, 0 | true | Sub GetVisible (control As IRibbonControl, ByRef returnedVal) |
Using Built-in splitButton Controls
Microsoft provides a wide variety of splitButton controls, one of which is the File SaveAs control. Although this splitButton resides on the Office Menu, we will replicate it as a custom Ribbon tab.
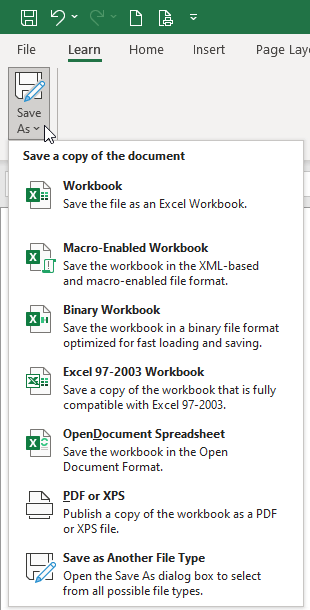
This is specified using the following XML:
<customUI xmlns="http://schemas.microsoft.com/office/2009/07/customui">
	<ribbon>
		<tabs>
			<tab id="tabLearn"
			     label="Learn"
			     insertBeforeMso="TabHome">
				<group id="grpDemo"
				       label="Demo">
					<splitButton idMso="FileSaveAsMenu"
					             size="large"/>
				</group>
			</tab>
		</tabs>
	</ribbon>
</customUI>
Because we are only using built-in controls, this example does not require VBA.
Creating Custom splitButton Controls
In this example, we add a splitButton that enables us to insert a new sheet in the workbook. Rather than right-click on the Sheet tab, choose Insert, and then select a sheet type, we allow users to insert a new sheet using the splitButton on the Insert tab. In addition, because inserting a sheet is likely a frequent task, we put our new control at the very beginning of the Ribbon.

XML
Copy and paste the following XML code into customUI14.xml. If you don't know how to do it, read this article: Creating a Custom Ribbon.
<customUI xmlns="http://schemas.microsoft.com/office/2009/07/customui">
	<ribbon>
		<tabs>
			<tab idMso="TabInsert">
				<group id="grpInsertSheet"
				       label="Sheets"
				       insertBeforeMso="GroupInsertTablesExcel">
					<splitButton id="sbtnInsertSheet"
					             size="large">
						<button id="btnSplitFace"
						        label="Sheets"
						        imageMso="CreateReportFromWizard"/>
						<menu id="menuInsertSheet">
							<button id="btnWorksheet"
							        label="Insert Worksheet"
							        imageMso="GetExternalDataFromText"
							        onAction="btnInsertSheet_click"/>
							<button id="btnChartsheet"
							        label="Insert Chart Sheet"
							        imageMso="PivotChartType"
							        onAction="btnInsertSheet_click"/>
						</menu>
					</splitButton>
				</group>
			</tab>
		</tabs>
	</ribbon>
</customUI>
VBA
Copy and paste the following VBA code into a normal module:
''------------------ Modules ------------------
''--------------- ExcelBaby.com ---------------
Option Explicit

'Callback for btnWorksheet onAction
Sub btnInsertSheet_click(control As IRibbonControl)
    Select Case control.id
        Case Is = "btnWorksheet"
            ActiveWorkbook.Worksheets.Add
        Case Is = "btnChartsheet"
            ActiveWorkbook.Charts.Add
    End Select
End Sub