You can't modify the Ribbon using VBA alone. Instead, you must write RibbonX code and insert the code into a workbook file outside of Excel. However, you can create a VBA macro that executes when a custom Ribbon control is activated.
RibbonX code is Extensible Markup Language (XML) that describes controls, including where they appear on the ribbon, what they look like, and what happens when you activate them.
Office RibbonX Editor
The Office RibbonX Editor is a standalone tool to edit the Custom UI part of Office open document file format. It contains both Office 2007 and Office 2010 custom UI schemas.
The Office 2010 custom UI schema is the latest schema and it's still being used in the latest versions of Office including Office 2019, Office 2021 and Office 365.
You can use the Office RibbonX editor to create custom ribbons for Add-ins, standard workbooks, or macro-enabled workbooks.
Read more about Office RibbonX Editor Project
Creating a Custom Ribbon
If you want to create a workbook that contains RibbonX code that modifies the Ribbon:
- Create a new Excel workbook, and insert a standard module.
- Save the workbook as macro-enabled.
- Close the workbook.
If you want to create a custom ribbon for an existing Add-in. If the Add-in is loaded, you need to uninstall it.
- In Excel, choose Developer tab > Add-ins group > Excel Add-ins to launch the "Add-ins" dialog box.
- Remove the check mark in the Add-ins dialog and click OK.
In this example, we create a custom ribbon for an existing Add-in.
- Download Office RibbonX Editor and Launch it (run OfficeRibbonXEditor.exe).
- Open your Add-in (or macro-enabled workbook) by clicking the Open button on the Office RibbonX Editor toolbar and navigating to the file.
- From the Insert menu, choose Office 2010+ Custom UI Part. This will add a
customUI14.xmlentry under your workbook in the tree view on the left.
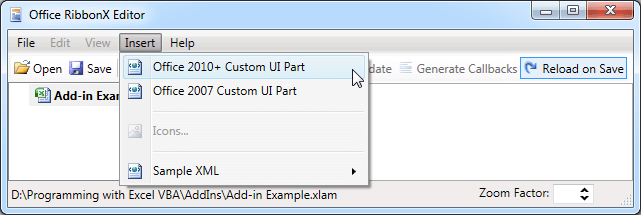
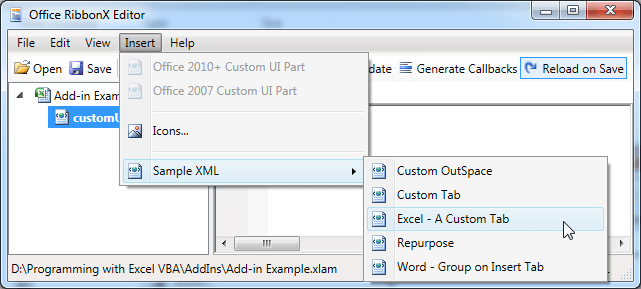
- From the Insert menu, choose Sample XML > Excel - A Custom Tab.
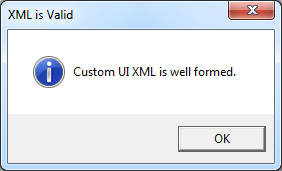
This step will enter a standard RibbonX code, as shown below:<customUI xmlns="http://schemas.microsoft.com/office/2009/07/customui"> <ribbon> <tabs> <tab id="customTab" label="Contoso" insertAfterMso="TabHome"> <group idMso="GroupClipboard"/> <group idMso="GroupFont"/> <group id="customGroup" label="Contoso Tools"> <button id="customButton1" label="ConBold" size="large" onAction="conBoldSub" imageMso="Bold"/> <button id="customButton2" label="ConItalic" size="large" onAction="conItalicSub" imageMso="Italic"/> <button id="customButton3" label="ConUnderline" size="large" onAction="conUnderlineSub" imageMso="Underline"/> </group> <group idMso="GroupEnterDataAlignment"/> <group idMso="GroupEnterDataNumber"/> <group idMso="GroupQuickFormatting"/> </tab> </tabs> </ribbon> </customUI> - Click the Validate button on the toolbar to verify the code to make sure there are no spelling errors. An XML document that conforms to the syntax rules is called a "Well Formed" XML document.
- Click the Generate Callbacks button on the toolbar.
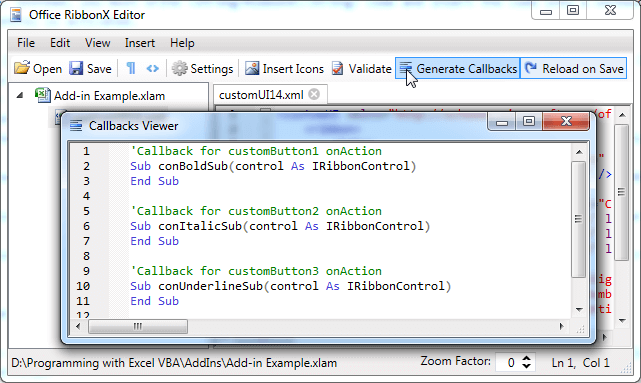
- Copy these procedures to the Clipboard so that you can paste them into the Add-in workbook later.
'Callback for customButton1 onAction Sub conBoldSub(control As IRibbonControl) End Sub 'Callback for customButton2 onAction Sub conItalicSub(control As IRibbonControl) End Sub 'Callback for customButton3 onAction Sub conUnderlineSub(control As IRibbonControl) End Sub - Choose File > Save and then choose File > Close.
- Activate Excel and reinstall the Add-in. You can install add-in by selecting its check box in the Add-ins dialog. You will now notice that the Contoso tab is added after the Home tab.
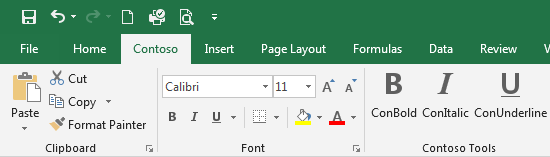
If the ConBold button is clicked, Excel shows error, so we need to add some code to the Add-in.

- Press Alt+F11 to open the VBE, and paste the callback procedures that you copied in step 7 into the module.
- You can add a MsgBox line to each procedure or call a exist sub, in this example, we add a MsgBox to each procedure, as shown below.
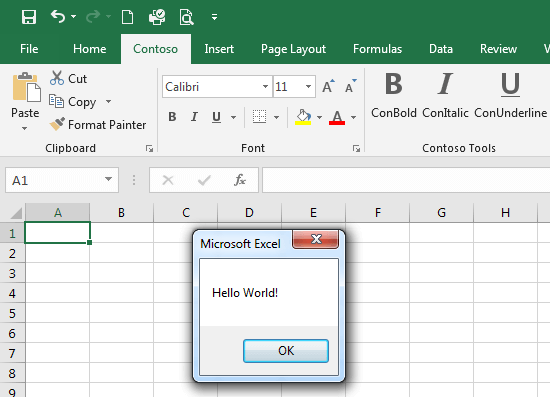
Option Explicit 'Callback for customButton1 onAction Sub conBoldSub(control As IRibbonControl) MsgBox "Hello World!" End Sub 'Callback for customButton2 onAction Sub conItalicSub(control As IRibbonControl) MsgBox "Hello Excel!" End Sub 'Callback for customButton3 onAction Sub conUnderlineSub(control As IRibbonControl) MsgBox "Hello ExcelBaby.com!" End Sub - Save your changes by choosing File > Save in the VBE.
- Return to Excel, activate the Contoso tab, and click your new buttons (In this example we click ConBold button.) to test that they work.
In the next chapter, we will discuss how to optimize your ribbon.
The new Ribbon group is displayed only when the workbook that contains the RibbonX code is the active workbook. To display Ribbon customizations when any workbook is active, convert the workbook to an add-in file or add the RibbonX code to your Personal Macro Workbook.