The menu element provides the user with a pre-defined list of options to pick from, and like the dropDown it can incorporate both images and text. One major limitation of a dropDown control is that it can only hold "items," whereas a menu control can hold a wide variety of other controls, including buttons, checkboxes, galleries, and even another menu.
Graphical View of menu Attributes
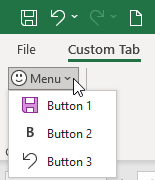
The following example shows the visible graphical attributes you can set on the menu control.
This is specified using the following XML:
<customUI xmlns="http://schemas.microsoft.com/office/2009/07/customui">
	<ribbon>
		<tabs>
			<tab id="customTab"
			     insertBeforeMso="TabHome"
			     label="Custom Tab">
				<group id="customGroup"
				       label="Custom Group">
					<menu id="menu"
					      label="Menu"
					      imageMso="HappyFace">
						<button id="button1"
						        label="Button 1"
						        imageMso="FileSave"/>
						<button id="button2"
						        label="Button 2"
						        imageMso="Bold"/>
						<button id="button3"
						        label="Button 3"
						        imageMso="Undo"/>
					</menu>
				</group>
			</tab>
		</tabs>
	</ribbon>
</customUI>
Parent Elements
- box
- buttonGroup
- dynamicMenu
- group
- menu
- officeMenu
- splitButton
Children Elements
- button
- checkbox
- control
- dynamicMenu
- gallery
- menu
- menuSeparator
- splitButton
- toggleButton
Required Attributes
The id, idQ, and idMso attributes are mutually exclusive. At least one of these attributes MUST be specified.
| ATTRIBUTE | WHEN TO USE |
|---|---|
| id | Create your own menu |
| idMso | Use an existing built-in menu |
| idQ | Create a menu shared between namespaces |
Optional insert Attributes
The insertAfterMso, insertAfterQ, insertBeforeMso, and insertBeforeQ attributes are mutually exclusive. If none of these attributes are specified, the controls SHOULD be appended to the existing set of controls, in the order they are defined in the XML.
| INSERT ATTRIBUTE | ALLOWED VALUES | DEFAULT VALUE | WHEN TO USE |
|---|---|---|---|
| insertAfterMso | Valid Mso Group | Insert at end of group | Insert after built-in control |
| insertBeforeMso | Valid Mso Group | Insert at end of group | Insert before built-in control |
| insertAfterQ | Valid Group idQ | Insert at end of group | Insert after shared namespace control |
| insertBeforeQ | Valid Group idQ | Insert at end of group | Insert before shared namespace control |
Optional Attributes and Callbacks
| STATIC ATTRIBUTE | DYNAMIC ATTRIBUTE | ALLOWED VALUES | DEFAULT VALUE | VBA CALLBACK SIGNATURE FOR DYNAMIC ATTRIBUTE |
|---|---|---|---|---|
| description | getDescription | 1 to 1024 characters | (none) | Sub GetDescription (control As IRibbonControl, ByRef returnedVal) |
| enabled | getEnabled | true, false, 1, 0 | true | Sub GetEnabled (control As IRibbonControl, ByRef returnedVal) |
| image | getImage | 1 to 1024 characters | (none) | Sub GetImage (control As IRibbonControl, ByRef returnedVal) |
| imageMso | getImage | 1 to 1024 characters | (none) | Sub GetImage (control As IRibbonControl, ByRef returnedVal) |
| itemSize | (none) | normal, large | normal | (none) |
| keytip | getKeytip | 1 to 3 characters | (none) | Sub GetKeytip (control As IRibbonControl, ByRef returnedVal) |
| label | getLabel | 1 to 1024 characters | (none) | Sub GetLabel (control As IRibbonControl, ByRef returnedVal) |
| screentip | getScreentip | 1 to 1024 characters | (none) | Sub GetScreentip (control As IRibbonControl, ByRef returnedVal) |
| showImage | getShowImage | true, false, 1, 0 | true | Sub GetShowImage (control As IRibbonControl, ByRef returnedVal) |
| showLabel | getShowLabel | true, false, 1, 0 | true | Sub GetShowLabel (control As IRibbonControl, ByRef returnedVal) |
| size | getSize | normal, large | normal | Sub GetSize (control As IRibbonControl, ByRef returnedVal) |
| supertip | getSupertip | 1 to 1024 characters | (none) | Sub GetSupertip (control As IRibbonControl, ByRef returnedVal) |
| tag | (none) | 1 to 1024 characters | (none) | (none) |
| visible | getVisible | true, false, 1, 0 | true | Sub GetVisible (control As IRibbonControl, ByRef returnedVal) |
Using Built-in menu Controls
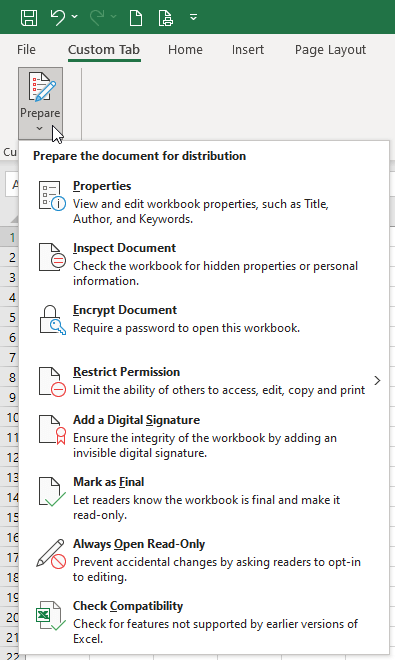
The following example adds the built-in FilePrepareMenu control to a custom group.
This is specified using the following XML:
<customUI xmlns="http://schemas.microsoft.com/office/2009/07/customui">
	<ribbon>
		<tabs>
			<tab id="customTab"
			     insertBeforeMso="TabHome"
			     label="Custom Tab">
				<group id="customGroup"
				       label="Custom Group">
					<menu idMso="FilePrepareMenu"
					      size="large"/>
				</group>
			</tab>
		</tabs>
	</ribbon>
</customUI>
Because we are only using built-in controls, this example does not require VBA.
Creating Custom menu Controls
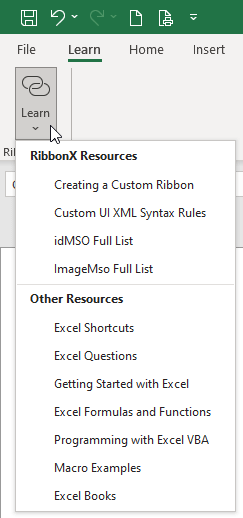
The following example creates a menu that holds a few useful Internet links. It will be contained on a custom group called "Ribbon Help" and placed in front of the Home tab.
XML
Copy and paste the following XML code into customUI14.xml. If you don't know how to do it, read this article: Creating a Custom Ribbon.
<customUI xmlns="http://schemas.microsoft.com/office/2009/07/customui">
	<ribbon>
		<tabs>
			<tab id="tabLearn"
			     label="Learn"
			     insertBeforeMso="TabHome">
				<group id="grpLearn"
				       label="Ribbon Help">
					<menu id="mnuResources"
					      imageMso="HyperlinkInsert"
					      size="large"
					      label="Learn">
						<menuSeparator id="menuSepRibbon"
						               title="RibbonX Resources"/>
						<button id="btnCreatingRibbon"
						        label="Creating a Custom Ribbon"
						        onAction="sharedLinks_click"
						        tag="https://excelbaby.com/learn/creating-a-custom-ribbon/"/>
						<button id="btnXMLSyntaxRules"
						        label="Custom UI XML Syntax Rules"
						        onAction="sharedLinks_click"
						        tag="https://excelbaby.com/learn/custom-ui-xml-syntax-rules/"/>
						<button id="btnidMSO"
						        label="idMSO Full List"
						        onAction="sharedLinks_click"
						        tag="https://excelbaby.com/learn/idmso-full-list-in-excel-for-windows/"/>
						<button id="btnImageMso"
						        label="ImageMso Full List"
						        onAction="sharedLinks_click"
						        tag="https://excelbaby.com/learn/imagemso-full-list/"/>
						<menuSeparator id="menuSepVBA"
						               title="Other Resources"/>
						<button id="btnExcelShortcuts"
						        label="Excel Shortcuts"
						        onAction="sharedLinks_click"
						        tag="https://excelbaby.com/excel-shortcuts/"/>
						<button id="btnQuestions"
						        label="Excel Questions"
						        onAction="sharedLinks_click"
						        tag="https://excelbaby.com/questions/"/>
						<button id="btnGettingStartedExcel"
						        label="Getting Started with Excel"
						        onAction="sharedLinks_click"
						        tag="https://excelbaby.com/course/getting-started-with-excel/"/>
						<button id="btnFormulasFunctions"
						        label="Excel Formulas and Functions"
						        onAction="sharedLinks_click"
						        tag="https://excelbaby.com/course/excel-formulas-and-functions/"/>
						<button id="btnProgrammingVBA"
						        label="Programming with Excel VBA"
						        onAction="sharedLinks_click"
						        tag="https://excelbaby.com/course/programming-with-excel-vba/"/>
						<button id="btnMacroExamples"
						        label="Macro Examples"
						        onAction="sharedLinks_click"
						        tag="https://excelbaby.com/course/excel-vba-and-macro-examples/"/>
						<button id="btnBooks"
						        label="Excel Books"
						        onAction="sharedLinks_click"
						        tag="https://excelbaby.com/book/"/>
					</menu>
				</group>
			</tab>
		</tabs>
	</ribbon>
</customUI>
VBA
Copy and paste the following VBA code into a normal module:
''------------------ Modules ------------------
''--------------- ExcelBaby.com ---------------
Option Explicit

'Callback for sharedLinks onAction
Sub sharedLinks_click(control As IRibbonControl)
    ActiveWorkbook.FollowHyperlink Address:=control.Tag, NewWindow:=True
End Sub
This code starts the hyperlink in a new web window. Simple, but why do we only need one line? Does it work for all the different menu items? The answer to this question is yes, of course, it all revolves around how we constructed the tag property.