The menuSeparator element specifies a horizontal separator line in a menu control. Like the separator control, the menuSeparator can be used to draw a line, except this control creates a horizontal line instead of vertical line.
Graphical View of menuSeparator Attributes
The following example shows a horizontal separator control between two buttons:
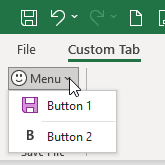
This is specified using the following XML:
<customUI xmlns="http://schemas.microsoft.com/office/2009/07/customui">
	<ribbon>
		<tabs>
			<tab id="customTab"
			     insertBeforeMso="TabHome"
			     label="Custom Tab">
				<group id="customGroup"
				       label="Custom Group">
					<menu id="menu"
					      label="Menu"
					      imageMso="HappyFace">
						<button id="button1"
						        label="Button 1"
						        imageMso="FileSave"/>
						<menuSeparator id="separator"/>
						<button id="button2"
						        label="Button 2"
						        imageMso="Bold"/>
					</menu>
				</group>
			</tab>
		</tabs>
	</ribbon>
</customUI>
Parent Elements
- menu
- officeMenu
- dynamicMenu
Children Elements
The menuSeparator does not support child controls of any kind.
Required Attributes
The id and idQ attributes are mutually exclusive. At least one of these attributes MUST be specified.
| ATTRIBUTE | WHEN TO USE |
|---|---|
| id | Create your own menuSeparator |
| idQ | Create a menuSeparator shared between namespaces |
Optional insert Attributes
The insertAfterMso, insertAfterQ, insertBeforeMso, and insertBeforeQ attributes are mutually exclusive. If none of these attributes are specified, the controls SHOULD be appended to the existing set of controls, in the order they are defined in the XML.
| INSERT ATTRIBUTE | ALLOWED VALUES | DEFAULT VALUE | WHEN TO USE |
|---|---|---|---|
| insertAfterMso | Valid Mso Group | Insert at end of group | Insert after built-in control |
| insertBeforeMso | Valid Mso Group | Insert at end of group | Insert before built-in control |
| insertAfterQ | Valid Group idQ | Insert at end of group | Insert after shared namespace control |
| insertBeforeQ | Valid Group idQ | Insert at end of group | Insert before shared namespace control |
Optional Attributes and Callbacks
| STATIC ATTRIBUTE | DYNAMIC ATTRIBUTE | ALLOWED VALUES | DEFAULT VALUE | VBA CALLBACK SIGNATURE FOR DYNAMIC ATTRIBUTE |
|---|---|---|---|---|
| title | getTitle | 1 to 1024 characters | line | Sub GetTitle (control As IRibbonControl, ByRef returnedVal) |
Using Built-in menuSeparator Controls
Like the separator and labelControl elements, Microsoft doesn't expose any menuSeparator controls for us to use.
Creating Custom menuSeparator Controls
Separating a custom Excel menu with textual separators
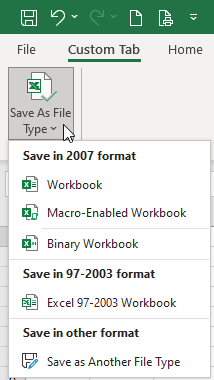
Copy and paste the following XML code into customUI14.xml. If you don't know how to do it, read this article: Creating a Custom Ribbon.
<customUI xmlns="http://schemas.microsoft.com/office/2009/07/customui">
	<ribbon>
		<tabs>
			<tab id="customTab"
			     insertBeforeMso="TabHome"
			     label="Custom Tab">
				<group id="grpSaveFiles"
				       label="Save File">
					<menu id="menuNewFile"
					      label="Save As File Type"
					      size="large"
					      imageMso="FileCompatibilityChecker">
						<menuSeparator id="menuSep01"
						               title="Save in 2007 format"/>
						<button idMso="FileSaveAsExcelXlsx"/>
						<button idMso="FileSaveAsExcelXlsxMacro"/>
						<menuSeparator id="menuSep02"/>
						<button idMso="FileSaveAsExcelXlsb"/>
						<menuSeparator id="menuSep03"
						               title="Save in 97-2003 format"/>
						<button idMso="FileSaveAsExcel97_2003"/>
						<menuSeparator id="menuSep04"
						               title="Save in other format"/>
						<button idMso="FileSaveAsOtherFormats"/>
					</menu>
				</group>
			</tab>
		</tabs>
	</ribbon>
</customUI>
In this XML code, notice that unlike the other menuSeparator controls, menuSep02 does not specify a title attribute. This is how we will create a thin line to separate the menu items, rather than use a title bar with a line.
Separating a custom Excel menu with linear separators
Alternately, maybe you prefer to have thin lines and to avoid the distraction created by titles. The uniform appearance of a menu with just faint lines and no titles gives the menu a totally different feel.

Copy and paste the following XML code into customUI14.xml. If you don't know how to do it, read this article: Creating a Custom Ribbon.
<customUI xmlns="http://schemas.microsoft.com/office/2009/07/customui">
	<ribbon>
		<tabs>
			<tab id="customTab"
			     insertBeforeMso="TabHome"
			     label="Custom Tab">
				<group id="grpSaveFiles"
				       label="Save File">
					<menu id="menuNewFile"
					      label="Save As File Type"
					      size="large"
					      imageMso="FileCompatibilityChecker">
						<menuSeparator id="menuSep01"/>
						<button idMso="FileSaveAsExcelXlsx"/>
						<button idMso="FileSaveAsExcelXlsxMacro"/>
						<menuSeparator id="menuSep02"/>
						<button idMso="FileSaveAsExcelXlsb"/>
						<menuSeparator id="menuSep03"/>
						<button idMso="FileSaveAsExcel97_2003"/>
						<menuSeparator id="menuSep04"/>
						<button idMso="FileSaveAsOtherFormats"/>
					</menu>
				</group>
			</tab>
		</tabs>
	</ribbon>
</customUI>
It is also worth pointing out that the first menuSeparator actually becomes invisible during this process. While the code still calls the element, it is ignored because it is above the first menu item.