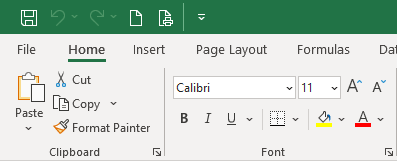
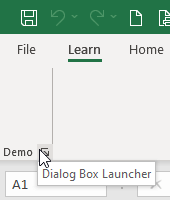
The dialogBoxLauncher element specifies a button that is the dialog box launcher control for a ribbon group. This tiny square with an arrow in it, shown in the lower-right corner of each
group, launches a dialog box. In most cases, the dialog launcher is used to provide the user with more options than the ribbon.
For example, consider a dialog box launcher control, as follows:
This is specified using the following XML:
<customUI xmlns="http://schemas.microsoft.com/office/2009/07/customui">
	<ribbon>
		<tabs>
			<tab id="tabLearn"
			     label="Learn"
			     insertBeforeMso="TabHome">
				<group id="grpDemo"
				       label="Demo">
					<dialogBoxLauncher>
						<button id="btnDialog"
						        screentip="Dialog Box Launcher"/>
					</dialogBoxLauncher>
				</group>
			</tab>
		</tabs>
	</ribbon>
</customUI>
Parent Elements
The only place where a dialogBoxLauncher may be used is on a group.
Children Elements
The dialogBoxLauncher is a container, nothing more. So, not only does it accept a child object, it also needs a child object to function. The dialogBoxLauncher must have one button and only one button as a child object.
Required and Optional Attributes
The dialogBoxLauncher doesn't have any - not even an id! The only job of this element is to launch another element; therefore, it doesn't need any attributes. Instead, dialogBoxLauncher relies on child objects to provide its own attributes.
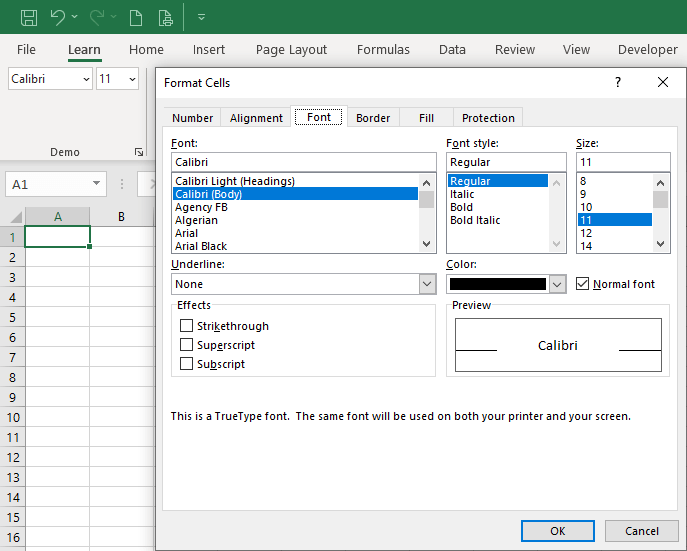
Using Built-in dialogBoxLauncher Controls
The following example adds two built-in comboBoxes (Font and FontSize) and a built-in dialogBoxlauncher (FormatCellsFontDialog) to a custom group.
This is specified using the following XML:
<customUI xmlns="http://schemas.microsoft.com/office/2009/07/customui">
	<ribbon>
		<tabs>
			<tab id="tabLearn"
			     label="Learn"
			     insertBeforeMso="TabHome">
				<group id="grpDemo"
				       label="Demo">
					<box id="boxFormat">
						<comboBox idMso="Font"
						          showLabel="false"/>
						<comboBox idMso="FontSize"
						          showLabel="false"/>
					</box>
					<dialogBoxLauncher>
						<button idMso="FormatCellsFontDialog"/>
					</dialogBoxLauncher>
				</group>
			</tab>
		</tabs>
	</ribbon>
</customUI>
A Custom dialogBoxLauncher with Built-in Dialogs
We will reuse the previous example and you can compare the differences.
XML
Copy and paste the following XML code into customUI14.xml. If you don't know how to do it, read this article: Creating a Custom Ribbon.
<customUI xmlns="http://schemas.microsoft.com/office/2009/07/customui">
	<ribbon>
		<tabs>
			<tab id="tabLearn"
			     label="Learn"
			     insertBeforeMso="TabHome">
				<group id="grpDemo"
				       label="Demo">
					<box id="boxFormat">
						<comboBox idMso="Font"
						          showLabel="false"/>
						<comboBox idMso="FontSize"
						          showLabel="false"/>
					</box>
					<dialogBoxLauncher>
						<button id="btnDialog"
						        onAction="btnDialog_click"
						        screentip="Dialog Box Launcher"/>
					</dialogBoxLauncher>
				</group>
			</tab>
		</tabs>
	</ribbon>
</customUI>
VBA
Copy and paste the following VBA code into a normal module:
'Callback for btnDialog onAction
Sub btnDialog_click(control As IRibbonControl)
    'show the cell format dialog box
    Application.CommandBars("Worksheet Menu Bar").Controls("Format").Controls("Cells...").Execute
End Sub
Here maybe you want to use Application.Dialogs(xlDialogFormatMain).Show to show "Cell Format" dialog box, but it's not working! The code xlDialogFormatMain is used to format the chart.
It appears that only the individual tabs can be shown using Application.Dialogs:
xlDialogFormatNumberxlDialogAlignmentxlDialogFormatFontxlDialogBorderxlDialogPatternsxlDialogCellProtection- members of the XlBuiltinDialog enumerated type
If you want to show the "Cell Format" dialog box with "Number, Alignment, Font, Border, Fill and Protection" tabs, use the following code:
Application.CommandBars("Worksheet Menu Bar").Controls("Format").Controls("Cells...").Execute
Custom dialogBoxLauncher with Custom Userforms
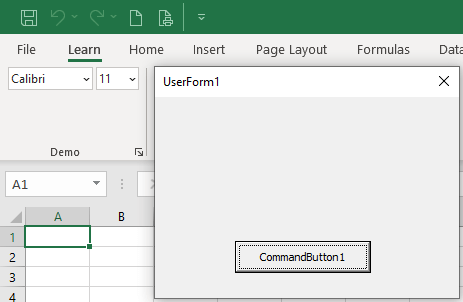
We'll reuse the XML code from the previous example, but the VBA code is a little different. Click custom Dialog Box Launcher will display UserForm1, click CommandButton1 will close UserForm1.
XML
Copy and paste the following XML code into customUI14.xml. If you don't know how to do it, read this article: Creating a Custom Ribbon.
<customUI xmlns="http://schemas.microsoft.com/office/2009/07/customui">
	<ribbon>
		<tabs>
			<tab id="tabLearn"
			     label="Learn"
			     insertBeforeMso="TabHome">
				<group id="grpDemo"
				       label="Demo">
					<box id="boxFormat">
						<comboBox idMso="Font"
						          showLabel="false"/>
						<comboBox idMso="FontSize"
						          showLabel="false"/>
					</box>
					<dialogBoxLauncher>
						<button id="btnDialog"
						        onAction="btnDialog_click"
						        screentip="Dialog Box Launcher"/>
					</dialogBoxLauncher>
				</group>
			</tab>
		</tabs>
	</ribbon>
</customUI>
VBA
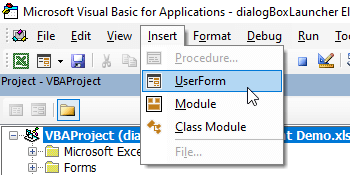
1. Press Alt+F11 to activate VBE, select your project and Insert a UserForm by click Menu bar > Insert > UserForm.
2. Select UserForm1 and click CommandButton.
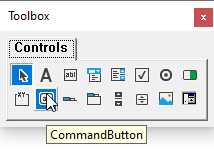
3. Click the UserForm1 location where you want the upper-left corner of the button to appear.
4. Double-click CommandButton1 and enter the following code:
Private Sub CommandButton1_Click()
    Unload Me
End Sub
5. Copy and paste the following VBA code into a normal module:
'Callback for btnDialog onAction
Sub btnDialog_click(control As IRibbonControl)
    'show UserForm1
    UserForm1.Show
End Sub