The box element specifies a grouping container control that can be used to align controls vertically or horizontally. Box elements can be nested to create complex UI layouts.
Graphical View of box Attributes
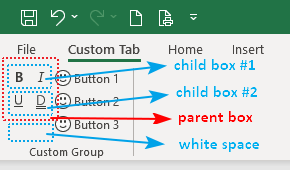
The following figure displays a Ribbon group with nested box controls used to create whitespace on the Ribbon.
This is specified using the following XML:
<customUI xmlns="http://schemas.microsoft.com/office/2009/07/customui">
	<ribbon>
		<tabs>
			<tab id="customTab"
			     insertBeforeMso="TabHome"
			     label="Custom Tab">
				<group id="customGroup"
				       label="Custom Group">
					<box id="box1"
					     boxStyle="vertical">
						<box id="box11"
						     boxStyle="horizontal">
							<toggleButton idMso="Bold"/>
							<toggleButton idMso="Italic"/>
						</box>
						<box id="box12"
						     boxStyle="horizontal">
							<toggleButton idMso="Underline"/>
							<toggleButton idMso="UnderlineDouble"/>
						</box>
					</box>
					<button id="btn1"
					        imageMso="HappyFace"
					        label="Button 1"/>
					<button id="btn2"
					        imageMso="HappyFace"
					        label="Button 2"/>
					<button id="btn3"
					        imageMso="HappyFace"
					        label="Button 3"/>
				</group>
			</tab>
		</tabs>
	</ribbon>
</customUI>
Children Elements
- box
- button
- buttonGroup
- checkBox
- comboBox
- control
- dropDown
- dynamicMenu
- editBox
- gallery
- labelControl
- menu
- splitButton
- toggleButton
Notice that the box control will also hold other box controls. This concept, known as nesting, can be very useful when you are trying to get controls to display in exactly the right order.
Parent Elements
- box
- group
Required Attributes
The id and idQ attributes are mutually exclusive. At least one of these attributes MUST be specified.
| ATTRIBUTE | WHEN TO USE |
|---|---|
| id | Create your own box |
| idQ | Create a box shared between namespaces |
To save you some time searching for something that isn’t there, Microsoft does not provide any built-in box elements, so the idMso attribute cannot be specified.
Optional insert Attributes
The insertAfterMso, insertAfterQ, insertBeforeMso, and insertBeforeQ attributes are mutually exclusive. If none of these attributes are specified, the controls SHOULD be appended to the existing set of controls, in the order they are defined in the XML.
| INSERT ATTRIBUTE | ALLOWED VALUES | DEFAULT VALUE | WHEN TO USE |
|---|---|---|---|
| insertAfterMso | Valid Mso Group | Insert at end of group | Insert after built-in control |
| insertBeforeMso | Valid Mso Group | Insert at end of group | Insert before built-in control |
| insertAfterQ | Valid Group idQ | Insert at end of group | Insert after shared namespace control |
| insertBeforeQ | Valid Group idQ | Insert at end of group | Insert before shared namespace control |
Optional Attributes and Callbacks
| STATIC ATTRIBUTE | DYNAMIC ATTRIBUTE | ALLOWED VALUES | DEFAULT VALUE | VBA CALLBACK SIGNATURE FOR DYNAMIC ATTRIBUTE |
|---|---|---|---|---|
| boxStyle | (none) | horizontal, vertical | horizontal | (none) |
| visible | getVisible | true, false, 1, 0 | True | Sub GetVisible (control As IRibbonControl, ByRef returnedVal) |
Using Built-in box Controls
The only purpose of the box element is to group other controls, so it makes sense that Microsoft does not expose any built-in box controls for use as commands. Therefore, there it has no need for an idMso.
Creating Custom box Controls
The following examples will give you a thorough understanding of the box control and how to use it in any configuration. Whether it's horizontal, vertical, nested, or any combination of them.
Horizontal Alignment
The following example creates a horizontal box, (highlighted by the added red lines) to group the four formatting elements together, allowing them to be moved as one unit. In addition to allowing the buttons to span more than one column, the horizontal group also creates "whitespace" to the right of Button 1 and Button 2. You’ll notice that Button 3 and Button 4 do not have this "padding".

Copy and paste the following XML code into customUI14.xml. This example won't require using any VBA code. If you don't know how to do it, read this article: Creating a Custom Ribbon.
<customUI xmlns="http://schemas.microsoft.com/office/2009/07/customui">
	<ribbon>
		<tabs>
			<tab id="customTab"
			     insertBeforeMso="TabHome"
			     label="Custom Tab">
				<group id="customGroup"
				       label="Custom Group">
					<box id="boxFormat1"
					     boxStyle="horizontal"
					     visible="true">
						<toggleButton idMso="Bold"/>
						<toggleButton idMso="Italic"/>
						<toggleButton idMso="Underline"/>
						<toggleButton idMso="UnderlineDouble"/>
					</box>
					<button id="btnHappy1"
					        imageMso="HappyFace"
					        label="Button 1"/>
					<button id="btnHappy2"
					        imageMso="HappyFace"
					        label="Button 2"/>
					<button id="btnHappy3"
					        imageMso="HappyFace"
					        label="Button 3"/>
					<button id="btnHappy4"
					        imageMso="HappyFace"
					        label="Button 4"/>
				</group>
			</tab>
		</tabs>
	</ribbon>
</customUI>
Vertical Alignment
Using the example presented in the "Horizontal Alignment" section, let’s look at what happens when we select a vertical alignment. Close the Excel file and reopen it in the CustomUI Editor. Scan the XML for the following line:
boxStyle="horizontal"Replace horizontal with vertical:
boxStyle="vertical"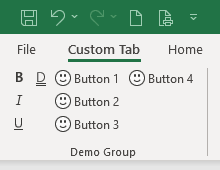
As you can see, the controls are now aligned from top to bottom and left to right, almost as though it didn't using a box control. The difference, however, is the whitespace under the Double Underline toggleButton. Of course, this would not be there if the four format controls were not in a box control. By using a box, the space is reserved for the controls in the box, and other controls cannot violate this space.
Nesting box Controls
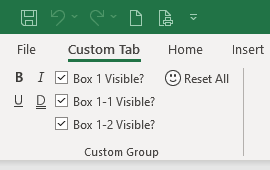
This example contains two box controls, each containing the two formatting controls used in the previous examples. Additionally, each of these boxes is inside a parent box, allowing us to reserve vertical space on the ribbon so that other buttons can't end up below our controls. We'll also use three checkboxes to choose which boxes are visible. Download Nesting box Controls Demo.
Copy and paste the following XML code into customUI14.xml. If you don't know how to do it, read this article: Creating a Custom Ribbon.
<customUI xmlns="http://schemas.microsoft.com/office/2009/07/customui"
          onLoad="IRibbonUI_onLoad">
	<ribbon startFromScratch="false">
		<tabs>
			<tab id="customTab"
			     insertBeforeMso="TabHome"
			     label="Custom Tab">
				<group id="customGroup"
				       label="Custom Group">
					<box id="box1"
					     boxStyle="vertical"
					     getVisible="boxShared_getVisible">
						<box id="box11"
						     boxStyle="horizontal"
						     getVisible="boxShared_getVisible">
							<toggleButton idMso="Bold"/>
							<toggleButton idMso="Italic"/>
						</box>
						<box id="box12"
						     boxStyle="horizontal"
						     getVisible="boxShared_getVisible">
							<toggleButton idMso="Underline"/>
							<toggleButton idMso="UnderlineDouble"/>
						</box>
					</box>
					<checkBox id="chkVisibleBox1"
					          label="Box 1 Visible?"
					          getPressed="chkShared_getPressed"
					          onAction="chkShared_click"/>
					<checkBox id="chkVisibleBox11"
					          label="Box 1-1 Visible?"
					          getPressed="chkShared_getPressed"
					          onAction="chkShared_click"/>
					<checkBox id="chkVisibleBox12"
					          label="Box 1-2 Visible?"
					          getPressed="chkShared_getPressed"
					          onAction="chkShared_click"/>
					<button id="btnReset"
					        imageMso="HappyFace"
					        label="Reset All"
					        onAction="btnReset_click"/>
				</group>
			</tab>
		</tabs>
	</ribbon>
</customUI>
Note that in this case we actually have a total of three box controls, two of which are nested in the first. All three controls will use shared callbacks to simplify programming.
Copy and paste the following VBA code into a normal module:
''------------------ Modules ------------------
''--------------- ExcelBaby.com ---------------
Option Explicit

Dim MyRibbon As IRibbonUI
Dim bBox1_Visible As Boolean
Dim bBox11_Visible As Boolean
Dim bBox12_Visible As Boolean

'Callback for customUI.onLoad to make each box control visible
Sub IRibbonUI_onLoad(ribbon As IRibbonUI)
    Set MyRibbon = ribbon
    bBox1_Visible = True
    bBox11_Visible = True
    bBox12_Visible = True
End Sub

'Shared Callback for box1, box11 and box12 getVisible
Sub boxShared_getVisible(control As IRibbonControl, ByRef returnedVal)
    Select Case control.id
        Case "box1"
            returnedVal = bBox1_Visible
        Case "box11"
            returnedVal = bBox11_Visible
        Case "box12"
            returnedVal = bBox12_Visible
    End Select
End Sub

'Shared Callback for chkVisibleBox1, -Box11 and -Box12 getPressed
Sub chkShared_getPressed(control As IRibbonControl, ByRef returnedVal)
    Select Case control.id
        Case "chkVisibleBox1"
            returnedVal = bBox1_Visible
        Case "chkVisibleBox11"
            returnedVal = bBox11_Visible
        Case "chkVisibleBox12"
            returnedVal = bBox12_Visible
    End Select
End Sub

'Shared Callback for chkVisibleBox1, -Box11, -Box12 onAction
Sub chkShared_click(control As IRibbonControl, pressed As Boolean)
    Select Case control.id
        Case "chkVisibleBox1"
            bBox1_Visible = pressed
        Case "chkVisibleBox11"
            bBox11_Visible = pressed
        Case "chkVisibleBox12"
            bBox12_Visible = pressed
    End Select
    MyRibbon.Invalidate
End Sub

'Callback for btnReset to make buttons visible onAction
Sub btnReset_click(control As IRibbonControl)
    bBox1_Visible = True
    bBox11_Visible = True
    bBox12_Visible = True
    MyRibbon.Invalidate
End Sub
Now try clearing the check in the checkbox marked Box 1-1 Visible? You'll see the bold and italic icons disappear! Uncheck Box 1-2 Visible? All formatting buttons will disappear! Click the "Reset All" button to make everything visible again, or you can Recheck each checkbox control.
This time, uncheck the box labeled Box 1 Visible? This will toggle the parent box. Notice how it looks like nothing happened? However, if you now toggle the visibility of one of the nested box controls, it reacts differently. Go ahead and try a few different combinations. In addition to demonstrating how to nest boxes, this exercise provides some great tools for experimenting with the synergies of controls.
While you are permitted to use the getVisible callback to set a parent box to visible=“false”, this will not hide the parent box and all child controls as you might expect. Instead, both the parent and child box controls will be frozen in their current state — visible or not. The controls themselves will all be visible (if they were before the parent was toggled) and work, but any attempts to change the state of the nested controls by callbacks will be ignored. The effects of this will be reversed when the getVisible callback for the parent box is again set to true.
The only way to hide a parent box control is to hide all of the child items. Upon doing so, the parent box will collapse and therefore appear invisible, even though the box’s visible property is set to true.