To make it easier to organize and analyze a group of related data, you can turn a range of cells into an Excel Table. Tables make it easy to sort, filter, and format data within a sheet.
Working efficiently with your table data
Excel has some features that enable you to work efficiently with your table data:
- Using structured references: Instead of using cell references, such as A1 and R1C1, you can use structured references that reference table names in a formula.
- Ensuring data integrity: You can use the built-in data validation feature in Excel. For example, you may choose to allow only numbers or dates in a column of a table.
Create an Excel Table
Most of the time, you'll create a table from an existing range of data. However, Excel also allows you to create a table from an empty range so that you can fill in the data later. Now let's create a table from an existing data range:
- Make sure the range should not contain empty rows or empty columns.
- Select any cell within the range.
- Choose Insert > Tables > Table or press Ctrl+T.
- Excel opens Create Table dialog box, if the range is correct and the table has a header, click OK.
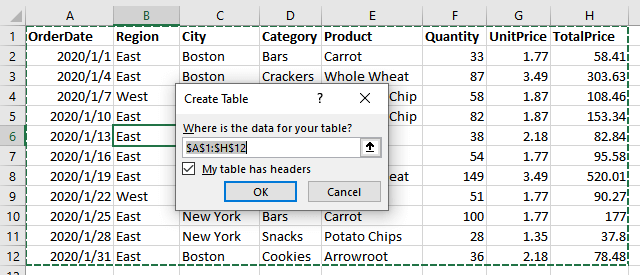
- The range is converted to a table with the default table style, and Filter buttons are automatically added in the header row of each column. The table will be given a default name, such as “Table1”.
- If Excel guesses wrong about the data range, click Cancel and resize the worksheet so that it is separated from other data by at least one blank row or column.
- You can also drag resizing handle (At the bottom right of the last cell in the table.) to change the size of the table.
- If the first row has headers, select My table has headers, otherwise, Excel generate default headers (Column1, Column2, Column3...).
- You can also change the names of tables, choose Formulas tab > Defined Names group > Name Manager.
Add data to a table
When you type in a cell below the last row or after the last column of the table, Excel automatically expands the table and applies the formatting, formulas, and data validation to the new row or column.
Show or hide Excel table elements
- Select any cell in the table, and the Table Design tab of the ribbon appears.
- In the Table Style Options group, check or uncheck any of the following:
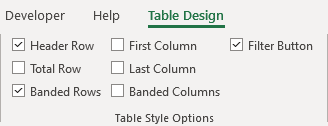
- Header Row - Apply or remove formatting from the first row in the table.
- Total Row - Quickly add SUBTOTAL functions like SUM, AVERAGE, COUNT, MIN/MAX to your table from a drop-down selection. SUBTOTAL functions allow you to include or ignore hidden rows in calculations.
- First Column - Apply or remove formatting from the first column in the table.
- Last Column - Apply or remove formatting from the last column in the table.
- Banded Rows - Display odd and even rows with alternating shading for ease of reading.
- Banded Columns - Display odd and even columns with alternating shading for ease of reading.
- Filter Button - Toggle AutoFilter on and off.
Change a table style
- Select any cell in the table, and the Table Design tab of the ribbon appears.
- In Table Styles group, click the table style that you want to use.
To change the default table style for the workbook, right-click the style in the Table Styles group and choose Set As Default from the shortcut menu.
Create a custom table style
Excel provides numerous predefined table styles that you can use to quickly format a table. If the predefined table styles don't meet your needs, you can create and apply a custom table style.
- Select any cell in the table that you want to use to create a custom style.
- Do one of the following:
- Choose Home > Styles > Format as Table > New Table Style.
- Expand the Table Styles gallery from the Table Design tab >Table Styles group > New Table Style.
- Excel opens the New Table Style dialog.
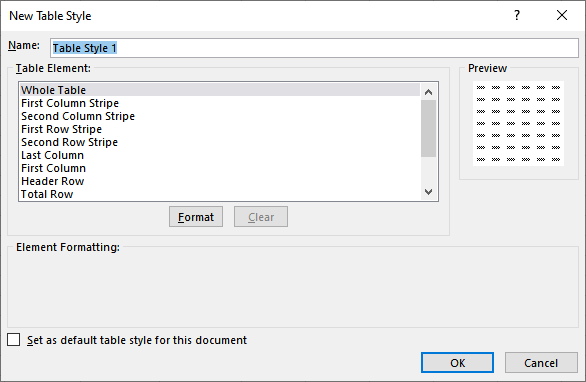
- In the Name box, type a name for the new table style.
- In the Table Element box, do one of the following:
- To format an element, click the element, then click Format, and then select the formatting options you want from the Font, Border or Fill tabs.
- To remove existing formatting from an element, click the element, and then click Clear.
- Under Preview, you can see how the formatting changes that you made affect the table.
- To use the new table style as the default table style in the current workbook, select the Set as default table style for this document check box.
Delete a custom table style
You can delete only custom table styles so that it is no longer applied to a table.
- Do one of the following:
- Choose Home > Styles > Format as Table.
- Expand the Table Styles gallery from the Table Design tab >Table Styles group.
- Under Custom, right-click the table style that you want to delete, and then click Delete on the shortcut menu.
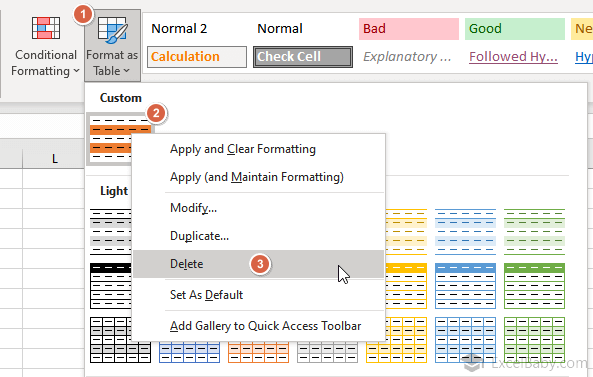
- All tables in the current workbook that are using that table style will be displayed in the default table format.
Remove a table style
- Select any cell in the table, and the Table Design tab of the ribbon appears.
- Choose Table Design tab >Table Styles group > Expand the Table Styles gallery.
- Click Clear.
- The table will be displayed in the default table format.
Filter a table with slicers
You can simply use Filter to filter the table:
- Click the Filter button in the row header that needs to be filtered.
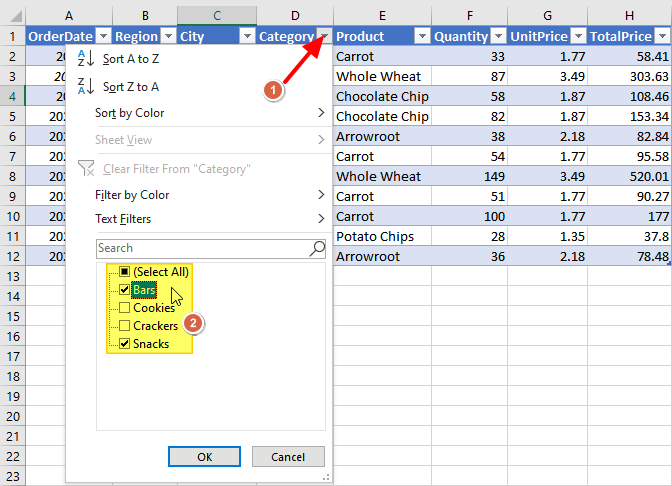
- Check or uncheck the fields.
- Click OK.
Another way to filter a table is to use one or more slicers. Slicers are very visual, and it's easy to see exactly what type of filtering is in effect. To add one or more slicers:
- Select any cell in the table.
- Choose Table Design > Tools > Insert Slicer.
- Excel opens Insert Slicers dialog box that displays each header in the table.
- Check the header which you want to filter and click OK. In this example, check City and Product.
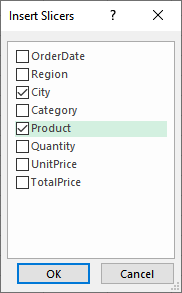
- In this example, the table is filtered to show only the records for Arrowroot, Whole Wheat in Boston city.

- If you no longer need a slicer, select the slicer and press Delete.
Remove duplicates data
To remove duplicates rows of a table:
- Select any cell in the table.
- Choose Table Design > Tools > Remove Duplicates.
- Excel opens Remove Duplicates dialog box that displays each header in the box.
- If the first row has headers, select My data has headers, otherwise, uncheck it.
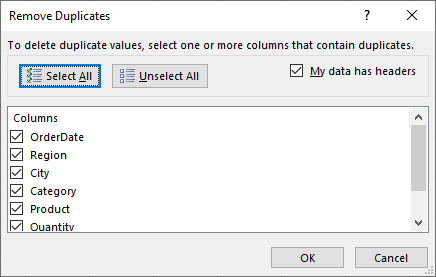
- You can also pick which columns should be checked for duplicate information.
- Click Ok.
Convert table to a range
You can turn an Excel table back into a range of data:
- Click in the table, then select the Table Design tab > Tools group > Convert to Range.
- Click Yes to confirm that you do want to convert the table to a data range.
- The cell styles will be preserved, but the filter boxes will be removed from the headers.
- The Total row will still appear, but all references will now be standard $A$1-style absolute cell references.
- To convert the range back into the table, you will need to recreate formulas for the Totals row and calculated columns.
- To remove the table style from the cells, select all the data, choose Home tab > Styles group > Normal style.