When a row of data is very wide and requires repeated horizontal scrolling, consider using a data form to add, edit, find, and delete rows.
Learn about data forms
A data form provides a convenient means to enter or display one complete row of information in a range or table without scrolling horizontally. You may find that using a data form can make data entry easier than moving from column to column when you have more columns of data than can be viewed on the screen. Use a data form when a simple form of text boxes that list the column headings as labels is sufficient and you don't need sophisticated or custom form features, such as a list box or spin button.
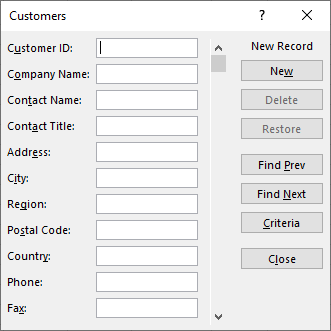
Microsoft Excel can automatically generate a built-in data form for your range or table. The data form displays all column headers as labels in a single dialog box. Each label has an adjacent blank text box in which you can enter data for each column, up to a maximum of 32 columns. In a data form, you can enter new rows, find rows by navigating, or (based on cell contents) update rows and delete rows. If a cell contains a formula, the formula result is displayed in the data form, but you cannot change the formula by using the data form.
You cannot print a data form. In addition, because a data form is a modal dialog box, you cannot use either the Excel Print command or Print button until you close the data form. Alternatively, you can use the Windows Print Screen key to make an image of the form, and then copy it to Microsoft Paint or another program.
Add the Form button to the ribbon
To add the Form button to the Quick Access Toolbar, do the following:
- Click the arrow next to the Quick Access Toolbar, and then click More Commands.
- In the Choose commands from box, click All Commands, and then select the Form button in the list.
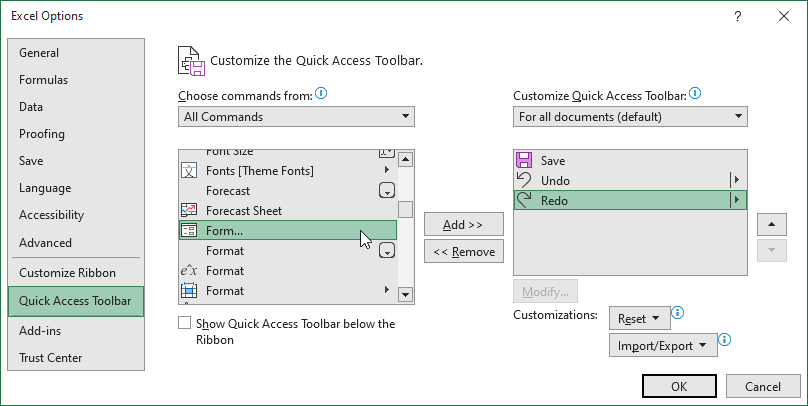
- Click Add, and then click OK.
Use a data form
You can use a data form to add, find, change, and delete rows in a range or table.
Launch the data form
- If necessary, add a column header to each column in the range or table. Excel uses these column headers to create labels for each field on the form. Make sure that there are no blank lines in the range of data.
- Click a cell in the range or table to which you want to add the form.
- On the Quick Access Toolbar, click Form icon (or press Excel access key: ALT D O).
If you see a message that states "Too many fields in the data form." you need to reduce the number of columns, because a data form can contain only up to 32 columns. One solution (when working with a range of columns) is to insert a blank column, effectively breaking one range into two ranges. Then, if necessary, create a separate data form for the columns to the right of the blank column.
Add a new row of data
- In the data form, click New.
- In the data form that appears, type the data for the new row in the fields provided. To move to the next field in the row, press Tab. To move to the previous field, press Shift + Tab.
- After you have finished typing data, press Enter to save your changes and add the row to the bottom of the range or table.
Note
If you see a message that states "Cannot extend list or database." this could mean that existing data may be overwritten if you continue. If you add a row to a table or range by using a data form, Excel expands it downward. If expanding the table would overwrite existing data, Excel displays the message Cannot extend list or database. Rearrange the data on your worksheet so that the range or table can expand downward from the last row.
Before you press Enter, you can undo any changes by clicking Restore in the data form. Any data that you have typed in the fields is discarded.
Find a row by navigating
Do one or more of the following:
- To move through rows one at a time, use the scroll bar arrows in the data form.
- To move through 10 rows at a time, click the scroll bar in the area between the arrows.
- To move to the next row in the range or table, click Find Next.
- To move to the previous row in the range or table, click Find Prev.
Find a row by entering search criteria
- Click Criteria, and then enter the comparison criteria in the data form. All items that begin with the comparison criteria are filtered. For example, if you type the text
Davas a criterion, Excel finds "Davidovski" and "Davis." To find text values that share some characters but not others, use a wildcard character as your criterion. The following wildcard characters can be used as comparison criteria for filters, and when you search for and replace content.
Use To find ?(question mark)Any single character. For example, sm?thfinds "smith" and "smyth"*(asterisk)Any number of characters. For example, *eastfinds "Northeast" and "Southeast"~(tilde) followed by ?, *, or ~A question mark, asterisk, or tilde. For example, fy91~?finds "fy91?" - To find rows that match the criteria, click Find Next or Find Prev.
- To return to the data form so that you can add, change, or delete rows, click Form.
Change data in a row
- Find the row that you want to change.
- Change the data in the row. To move to the next field in the row, press Tab. To move to the previous field, press Shift + Tab.
- After you finish changing data, press Enter to update the row. Excel automatically moves to the next row.
Note
Before you press Enter, you can undo any changes by clicking Restore.
Delete a row
- In the data form, find the row that you want to delete.
- Click Delete.
Warning
Excel prompts you to confirm the operation. You cannot undo a row deletion after you confirm it.
Close a data form
To close the data form and return to the worksheet, click Close in the data form.