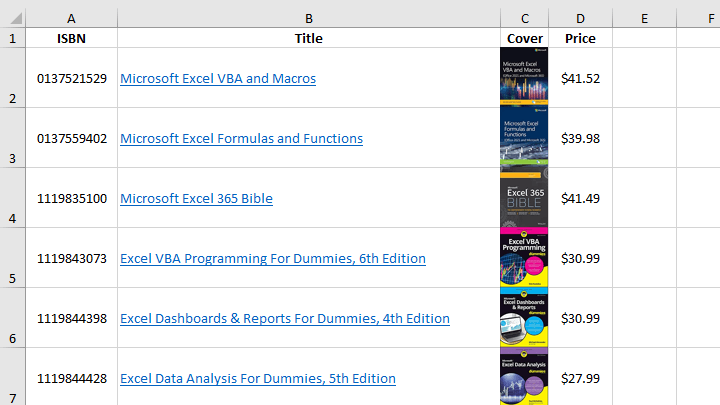
Think you have a price list to send to your customers, you need to insert multiple product pictures in Excel, of course you can manually insert multiple pictures in Excel cells and resize them, but this macro does it all at once. The final result is shown below:
Bulk Insert Pictures in Cells and Resize Them
'------------------ Modules ------------------
Sub InsertPictures()
    'Declare your variables
    Dim MR As Range
    Dim strPic As String
    Dim i As Integer
    Application.ScreenUpdating = False  'Turn off screen updating

    i = ActiveSheet.Shapes.Count + 1

    For Each MR In Selection    'Loop through all selected ranges
        If Not IsEmpty(MR) Then 'Non-empty range
            'Define your pictures location
            strPic = ThisWorkbook.Path & "\Products\" & MR.Value & ".jpg"

            If FileExists(strPic) Then 'Determine if the picture exists
                With MR
                    'Add a shape that just fits the cell size
                    With ActiveSheet.Shapes.AddShape(msoShapeRectangle, .Left, .Top, .Width, .Height)
                        .Name = "ProductID-" & i    'rename the shape
                        .Fill.UserPicture strPic    'Fill picture in the shape
                        .Line.Visible = msoFalse    'No picture border
                    End With
                End With

                i = i + 1
            End If
        End If
    Next

    Application.ScreenUpdating = True   'Turn on screen updating
End Sub

Sub DeletePictures()
    Application.ScreenUpdating = False  'Turn off screen updating
    Dim pic As Shape
    For Each pic In ActiveSheet.Shapes
        If Left(pic.Name, 9) = "ProductID" Then 'only delete ProductID shapes
            pic.Delete
        End If
    Next
    Application.ScreenUpdating = True   'Turn on screen updating
End Sub

Function FileExists(FilePath As String) As Boolean
'Step 1: Declare your variables.
    Dim FileName As String
'Step 2: Use the Dir function to get the file name
    FileName = Dir(FilePath)
'Step 3:  If file exists, return True else False
    If FileName <> "" Then FileExists = True _
    Else: FileExists = False
End Function
How This Macro Works
Suppose your product picture is placed in the Products directory, and the Excel document containing this macro is in the same directory as the Products directory, the picture you want to insert is in Column C, and Column C stores the name of the product picture (here is the ISBN of the book).
1. Select the range of which you want to insert pictrues, here we select Column C or any range that contains product names (Select the range C2:C10 will run faster than Column C).
2. Loop through all selected ranges
3. Determine if the picture exists
3. If the picture exists, add a shape to each cell that just fits the cell size
4. Fill picture in the shape
You can edit line 14 to suit your situation, eg.
Specified directory:
strPic = "D:\Products\" & MR.Value & ".jpg"Before or after the macro runs, you can select column C to adjust the column width, or select the second row to the tenth row to adjust the row height to resize the pictures.
Delete all pictures: run the macro: DeletePictures, this macro only delete ProductID shapes.
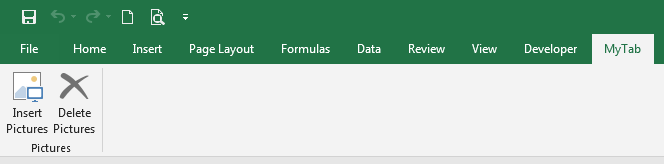
Creat a Custom Ribbon for this Macro
It is highly recommended to create a custom ribbon for this macro.
customUI14.xml
Copy and paste RibbonX code below into customUI14.xml and save.
<customUI xmlns="http://schemas.microsoft.com/office/2009/07/customui" onLoad="ribbonLoaded">
	<ribbon>
		<tabs>
			<tab id="customTab" label="MyTab" insertAfterMso="TabDeveloper">
				<group id="customGroup" label="Pictures">
                    <button id="InsertPictures" label="Insert Pictures" imageMso="PictureInsertFromFile" size="large" onAction="InsertPictures" />
                    <button id="DeletePictures" label="Delete Pictures" imageMso="Delete" size="large" onAction="DeletePictures" />
				</group>
			</tab>
		</tabs>
	</ribbon>
</customUI>
Excel normal module
Copy and paste macro code below into the normal module.
Option Explicit

Public MyRibbon As IRibbonUI

'Callback for customUI.onLoad
Sub ribbonLoaded(Ribbon As IRibbonUI)
    Set MyRibbon = Ribbon
    MyRibbon.ActivateTab ("customTab")
End Sub

'Callback for InsertPictures onAction
Sub InsertPictures(control As IRibbonControl)
    'Declare your variables
    Dim MR As Range
    Dim strPic As String
    Dim i As Integer
    Application.ScreenUpdating = False  'Turn off screen updating

    i = ActiveSheet.Shapes.Count + 1

    For Each MR In Selection    'Loop through all selected ranges

        If Not IsEmpty(MR) Then 'Non-empty range
            'Define your pictures location
            strPic = ThisWorkbook.Path & "\Products\" & MR.Value & ".jpg"

            If FileExists(strPic) Then 'Determine if the picture exists
                With MR
                    'Add a shape that just fits the cell size
                    With ActiveSheet.Shapes.AddShape(msoShapeRectangle, .Left, .Top, .Width, .Height)
                        .Name = "ProductID-" & i    'rename the shape
                        .Fill.UserPicture strPic    'Fill picture in the shape
                        .Line.Visible = msoFalse    'No picture border
                    End With
                End With

                i = i + 1
            End If
        End If
    Next

    Application.ScreenUpdating = True   'Turn on screen updating
End Sub

'Callback for DeletePictures onAction
Sub DeletePictures(control As IRibbonControl)
    Application.ScreenUpdating = False  'Turn off screen updating
    Dim pic As Shape
    For Each pic In ActiveSheet.Shapes
        If Left(pic.Name, 9) = "ProductID" Then 'only delete ProductID shapes
            pic.Delete
        End If
    Next
    Application.ScreenUpdating = True   'Turn on screen updating
End Sub

Function FileExists(FilePath As String) As Boolean
'Step 1: Declare your variables.
    Dim FileName As String
'Step 2: Use the Dir function to get the file name
    FileName = Dir(FilePath)
'Step 3:  If file exists, return True else False
    If FileName <> "" Then FileExists = True _
    Else: FileExists = False
End Function
Example download
How to Use This Macro
Most VBA code should be placed in Standard Modules unless specified.
If you see a comment '------------------ Modules------------------ in the code header that means put the code in a Standard Module. For more information, learn this course: Where should I put the Excel VBA code?
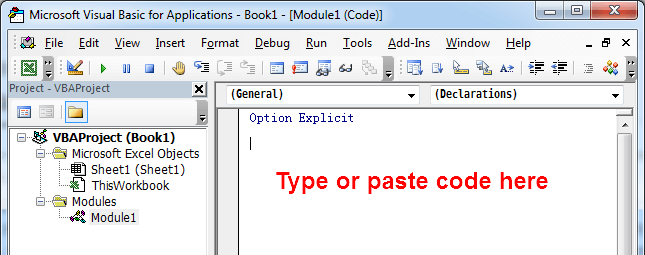
The following steps teach you how to put VBA code into a Standard Module:
- Activate the Visual Basic Editor by pressing ALT + F11.
- Right-click the project/workbook name in the Project Window.
- Choose Insert -> Module.

- Type or paste the code in the newly created module. You will probably need to change the sheet name, the range address, and the save location.
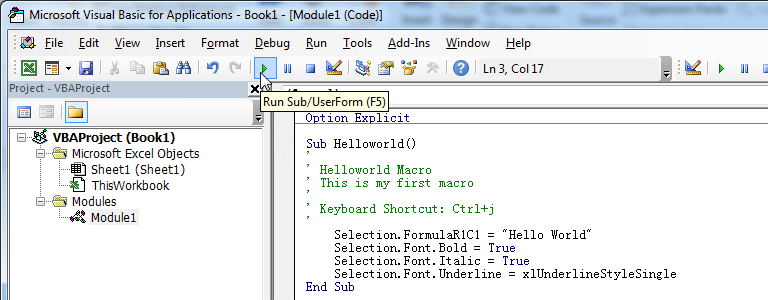
- Click Run button on the Visual Basic Editor toolbar.
- For more information, learn this course: Programming with Excel VBA