When your workbook contains multiple PivotTables, it is often helpful to have a checklist summary that outlines the basic details of the PivotTables. The following macro outputs such a summary.

Create a PivotTable Checklist Summary
'------------------ Modules ------------------
Sub PivotTableChecklist()
'Step 1: Declare your Variables
    Dim ws As Worksheet
    Dim pt As PivotTable
    Dim i As Integer
'Step 2: Add a new sheet with column headers
    Worksheets.Add
    Range("A1:F1") = Array("Pivot Name", "Worksheet", _
        "Location", "Cache Index", _
        "Source Data Location", _
        "Row Count")
'Step 3: Start the i Counter
    i = 2
'Step 4: Loop through each sheet in workbook
    For Each ws In Worksheets
'Step 5: Loop through each PivotTable
        For Each pt In ws.PivotTables
            Cells(i, 1) = pt.Name
            Cells(i, 2) = pt.Parent.Name
            Cells(i, 3) = pt.TableRange2.Address
            Cells(i, 4) = pt.CacheIndex
            Cells(i, 5) = Application.ConvertFormula _
                (pt.PivotCache.SourceData, xlR1C1, xlA1)
            Cells(i, 6) = pt.PivotCache.RecordCount
'Step 6: Increment the i counter
            i = i + 1
'Step 7: Work through all PivotTables and worksheets
        Next pt
    Next ws
'Step 8: Size columns to fit
    ActiveSheet.Cells.EntireColumn.AutoFit
End Sub
How This Macro Works
When you create a PivotTable object variable, you expose all of a PivotTable’s properties — properties like its name, location, cache index, and so on. In this macro, we loop through each PivotTable
in the workbook and extract specific properties into a new worksheet.
Because each PivotTable object is a child of the worksheet it sits in, we have to first loop through the worksheets in a workbook first, and then loop through the PivotTables in each worksheet.
1. Step 1 declares an object called ws, which holds each worksheet we loop through. We then declare an object called pt, which holds each PivotTable we loop through. Finally, we use the i variable as the index number.
2. Step 2 use Worksheets.Add method to create a new worksheet and use Array function to add column headings that range from A1 to F1. This new worksheet is our active sheet from now on.
3. Step 3 start the i counter, we will output the summary starting from the second Row.
4. Step 4 uses For Each...Next statement to start the looping, telling Excel we want to evaluate all worksheets in this workbook.
5. Step 5 uses For Each...Next statement to loop through all the PivotTables in each worksheet. For each PivotTable it finds, it extracts out the appropriate property and fills in the table based on the position.
We are using six PivotTable properties: Name, Parent.Name, TableRange2.Address, CacheIndex, PivotCache.SourceData, and PivotCache.Recordcount.
6. Step 6, Every time the macro encounters a new PivotTable, it increments the i count by 1, effectively starting a new row for each PivotTable.
7. Step 7 tells Excel to loop through all PivotTables and all worksheets.
8. Step 8 ends with some formatting, resizing the columns to fit the data.
How to Use This Macro
Most VBA code should be placed in Standard Modules unless specified.
If you see a comment '------------------ Modules------------------ in the code header that means put the code in a Standard Module. For more information, learn this course: Where should I put the Excel VBA code?
The following steps teach you how to put VBA code into a Standard Module:
- Activate the Visual Basic Editor by pressing ALT + F11.
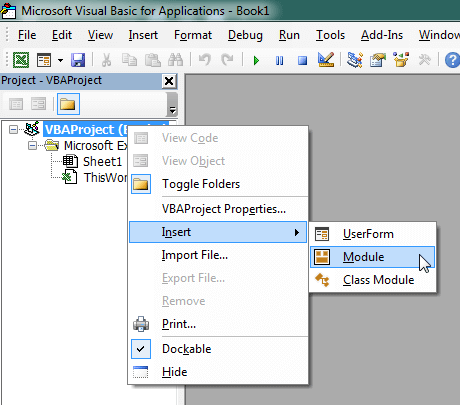
- Right-click the project/workbook name in the Project Window.
- Choose Insert -> Module.

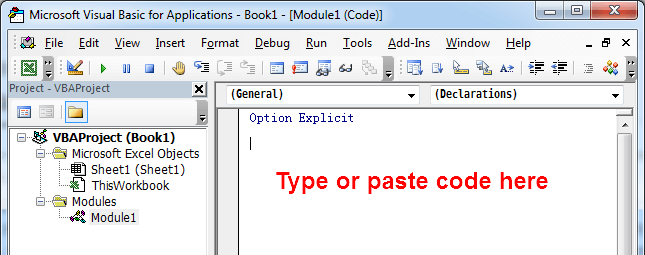
- Type or paste the code in the newly created module. You will probably need to change the sheet name, the range address, and the save location.

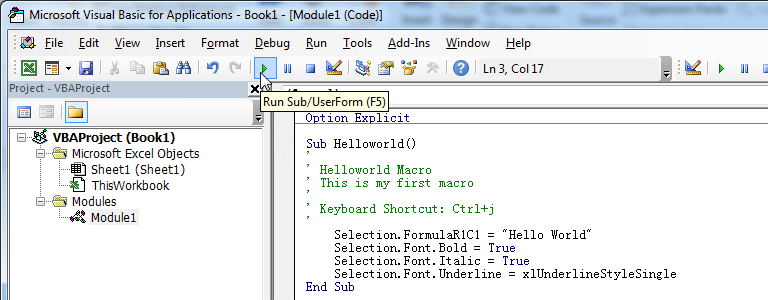
- Click Run button on the Visual Basic Editor toolbar.

- For more information, learn this course: Programming with Excel VBA