The Quick Access Toolbar (QAT) is an area of the user interface that provides quick access to commands. You can make Excel easier to use by customizing the Quick Access Toolbar to include the Excel commands you use most often. By default, the Quick Access Toolbar is located at the top left of the Excel title bar, above the Ribbon tabs, alternatively, you can display the Quick Access toolbar below the Ribbon, and the Quick Access Toolbar contains three buttons: Save, Undo, and Redo, but you can add any of Excel’s commands that you use often.
Use Customize Quick Access Toolbar’s drop-down menu to add command buttons
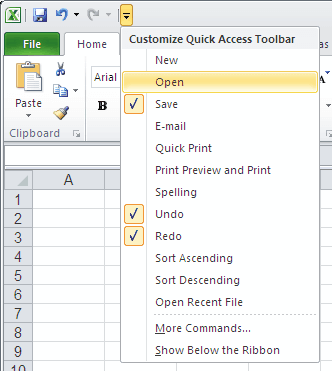
When you click the Customize Quick Access Toolbar button, a drop-down menu appears containing the following commands:
- New
- Open
- Save
- Quick Print
- Print Preview and Print
- Spelling
- Undo
- Redo
- Sort Ascending
- Sort Descending
- Open recent File
- Touch/Mouse Mode (available in Excel 2013)
To add any of the other commands on this menu to the toolbar, you simply click the option on the drop-down menu. Excel then adds a button for that command to the end of the Quick Access Toolbar and a check mark to its option on the drop-down menu.
To remove a command button that you add to the Quick Access Toolbar in this manner, click the option a second time on the Customize Quick Access Toolbar button’s drop-down menu. Excel removes its command button from the toolbar and the check mark from its option on the drop-down menu.
Quick add a Ribbon command button to the Quick Access Toolbar
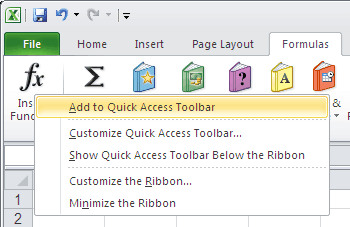
To quick add a Ribbon command button to the Quick Access toolbar, simply right-click its command button on the Ribbon and then click Add to Quick Access Toolbar on its shortcut menu. Excel then immediately adds the command button to the end of the Quick Access toolbar.
Quick remove a command button from the Quick Access Toolbar
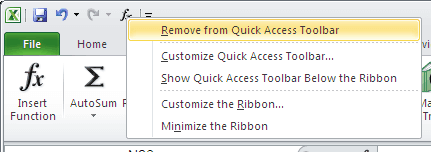
To quick remove a command button that you add to the Quick Access Toolbar, simply right-click the command button on the Quick Access Toolbar and then click Remove from Quick Access Toolbar on its shortcut menu.
Use the Options command to customize Quick Access Toolbar
You can add, remove, and change the order of the commands on the Quick Access Toolbar by using the Options command. To open Quick Access Toolbar dialog box, do one of the following:
- click the Customize Quick Access Toolbar button and then click the More Commands option near the bottom of its drop-down menu.
- Click the File tab, click Options. Click Quick Access Toolbar.
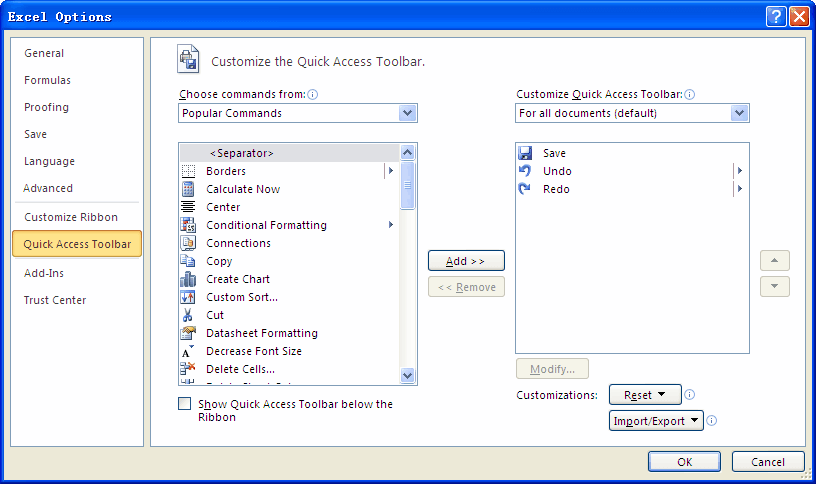
The left side of the Excel Options box displays a list of Excel commands, and the right side shows the commands currently on your Quick Access toolbar. Above the command list on the left is the Choose Commands From drop-down list from which you can filter the list. Select an item from the drop-down list, and the list displays only the commands for that item. Some of the items in the drop-down list are:
- Popular Commands: Displays commands that Excel users commonly use
- Commands Not in the Ribbon: Displays a list of commands that you cannot access from the Ribbon
- All Commands: Displays a complete list of Excel commands
- Macros: Displays a list of all available macros
- File Tab: Displays the commands available in the Backstage menu
- Home Tab: Displays all commands available when the Home tab is active
In addition, the Choose Commands From drop-down list contains an item for every other tab. To add an item to your Quick Access toolbar, select it from the list on the left and then click Add. The command appears in the list on the right.
Add a macro button to Quick Access Toolbar
- Select Macros from the Choose Commands From drop-down, Excel lists all available macros.
- Click the name of the macro to add in the Choose Commands From list box
- Click Add button
- To customize the macro button, click the Modify button to change the text and choose a different icon for the macro.
- When you finish making your Quick Access Toolbar customizations, click OK to close the Excel Options dialog box. The new icon will appear on the Quick Access toolbar.
Change the order of the Quick Access Toolbar icons
If you want to change the order of your Quick Access toolbar icons, you can do so from the Quick Access Toolbar tab of the Excel
Options dialog box. Select the command and then use the Up and Down arrow buttons on the right to move the icon.
Remove Quick Access toolbar icons
The quick way to remove an icon from your Quick Access toolbar is to right-click the icon and choose Remove from Quick Access
Toolbar. You can also use the Quick Access Toolbar tab of the Excel Options dialog box. Just select the command in the list on the right and click Remove.
Reset the Quick Access toolbar
If you want to return the Quick Access toolbar to its default state, display the Quick Access Toolbar tab of the Excel Options dialog box and
click the Reset button. Then choose Rest Only Quick Access Toolbar. All your customizations disappear, and the Quick Access toolbar then displays its three default commands: Save, Undo, Redo.
Share your Customize Quick Access Toolbar User Interface
In the Excel Options dialog box, the Quick Access Toolbar tab has an Import/Export button. You can use this button to Import and Export files that contain Quick Access Toolbar user interface customizations. If you want to share your customize Quick Access Toolbar User Interface to your office mates or friends, do the following:
- Click the Import/Export button
- Click Export All Customization
- Enter a filename and select a location for the file, then click Save.
- Share the file to your office mates.
Move the Quick Access Toolbar
The Quick Access Toolbar can be located in one of two places: Below the Ribbon and Above the Ribbon. The location below the ribbon closer to your work area. Therefore, if you want to maximize the work area, you might want to keep the Quick Access Toolbar in its default location (above the Ribbon). You can easier change the location do the following:
- Click Customize Quick Access Toolbar.
- In the drop-down menu list, click Show Below the Ribbon or Show Above the Ribbon.


