When you create macros, you may want to have a clear and easy way to run each macro. In this post We’ll show you how to assign a macro to a button form controls or a sharp.
we'll use this simple macro for our example.
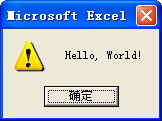
Sub HelloWorld()
  MsgBox "Hello, World!", vbExclamation
End Sub
When the macro is run, we see a simple message.
Assign a Macro to a Button Form Controls
As luck would have it, Excel offers a set of form controls designed specifically for creating user interfaces directly on spreadsheets. There are several different types of form controls, from buttons (the most commonly used control) to scrollbars.
The idea behind using a form control is simple. You place a form control on a spreadsheet and then assign a macro to it — that is, a macro you’ve already recorded. When a macro is assigned to the control, that macro is executed, or played, when the control is clicked.
Take a moment to create a button for the HelloWorld macro you created earlier. Here’s how:
1. Click the Insert button under the Developer tab.
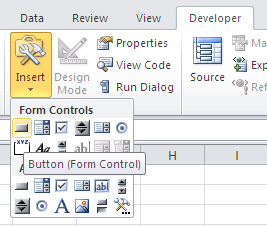
2. Select the Button Form Control from the drop-down list that appears.
3. Click the location where you want to place your button. When you drop the button control onto your spreadsheet, the Assign Macro dialog box activates and asks you to assign a macro to this button.
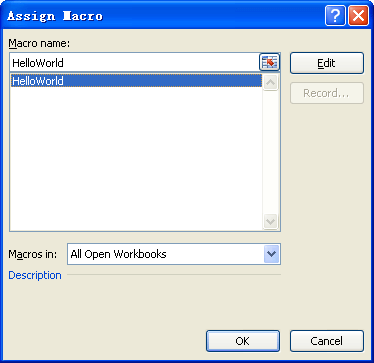
4. Select the macro you want to assign to the button, in this case, we select HelloWorld, and then click OK.
Assign a Macro to a Sharp
1.Click the Shapes button under the Insert tab.
2.Select the Rectangle from the drop-down list that appears.
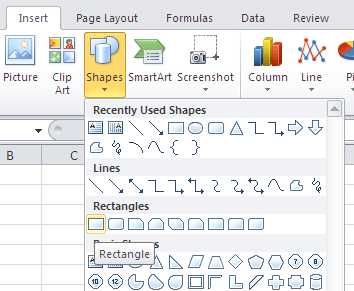
3.Click the location where you want to place your shape.
4.Right click on the shape, choose Assign Macro.
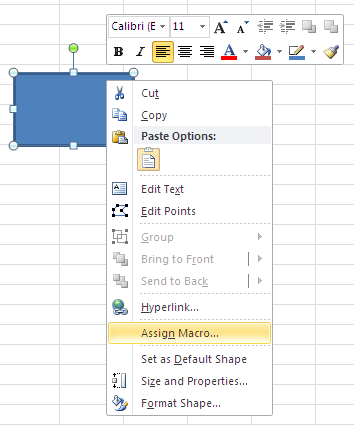
5.the Assign Macro dialog box activates and asks you to assign a macro to this shape.
6. Select the macro you want to assign to the shape, in this case, we select HelloWorld, and then click OK.